

Sex Doll Areola Options: A Complete Customization Guide
For realism, choose multi-tone areola shading with medium nipple projection and a diameter matched to bust size. For low maintenance, pick embedded silicone nipples over painted finishes. For budget, a single-shade airbrushed areola gets you most of the visual payoff at a fraction of the cost. Every custom order should specify five things: diameter, color and tone approach, nipple projection level, texture details like Montgomery glands, and application method.
- Diameter: typically 30 to 45mm, chosen relative to breast size
- Color and tone: single shade, multi-tone blended, or layered shading
- Nipple projection: flush, low, medium, or high (embedded silicone)
- Texture: smooth, subtle Montgomery gland stippling, or fine micro-detail
- Application method: hand-painted, airbrushed, 3D shaded, or embedded silicone
Pro Tip: Before you place an order, ask the maker one question: “Do you blend multiple pigment tones or apply a single flat color?” Multi-tone blending is the single biggest factor separating a convincing areola from one that reads as painted-on.
Key Takeaways
The most realistic sex doll areola options combine multi-tone pigment blending with material-matched application methods, while embedded silicone nipples offer the most durable projection over time.
| Point | Details |
|---|---|
| Match method to material | Silicone favors multi-tone 3D shading; TPE favors molded shaping with airbrushed color. |
| Prioritize blending over flat color | Multi-tone pigment blending consistently outperforms single-shade finishes for realism. |
| Expect gradual fading | Reconstructive tattoo research shows measurable color fade within the first year, so plan for eventual touch-ups. |
| Supply clear references | Provide diameter in millimeters, reference photos, and projection preference to reduce revision rounds. |
| Order through Youqdoll for full customization | Youqdoll lets buyers specify diameter, tone, projection, and texture with proof approval before production. |
Table of Contents
- What Sex Doll Areola Options Actually Cover
- Silicone vs. TPE: How Base Material Shapes Your Areola Choices
- Choosing Areola Color: Single Shade vs. Multi-Tone Blending
- Sizing Areolas and Choosing the Right Nipple Projection
- How Areolas Are Actually Made: Paint, Airbrush, and 3D Shading
- What to Prepare Before You Place a Custom Areola Order
- Keeping Areola Finishes Looking Real Over Time
- A Decision Checklist for Picking Your Areola Configuration
- The Paramedical Science Behind Realistic Areola Shading
- Author Perspective: Realism Versus Upkeep
- Ready to Order? Here’s How Custom Areolas Work With YouQDOLL
- Frequently Asked Questions
- Sources
What Sex Doll Areola Options Actually Cover
“Sex doll areola options” is shorthand for a full menu of customizable attributes, and most buyers only think about color until they see an order form. In the doll industry, this menu draws directly from paramedical tattooing, the same discipline used in nipple areola complex (NAC) reconstruction after mastectomy. Doll makers didn’t invent these techniques. They adapted them.
Here’s the full inventory you’ll actually see on a customization form:
- Areola diameter: the circular pigmented area’s size, usually specified in millimeters
- Areola color and tone: ranging from pale pink to deep brown, often blended rather than flat
- Nipple size and projection: how far the nipple extends from the surface
- Nipple texture: smooth versus slightly raised or wrinkled detailing
- Areola texture: small bumps that mimic Montgomery glands, the natural sebaceous glands around a real areola
- Symmetry and placement: how closely the left and right sides match, or whether you want deliberate natural asymmetry
Beyond the functional basics, some makers offer artistic extras: a faded outer border that blends into skin tone, freckled or variegated pigment patterns, or novelty designs like a subtle heart shape worked into the shading. These are aesthetic add-ons, not standard inventory, and availability varies by maker.
Not every option carries the same weight on your order. Color, tone blending, and surface texture are cosmetic-only choices. They change the look without altering the doll’s physical structure, and most makers can adjust them without extra tooling. Nipple projection, on the other hand, is a structural choice when you’re requesting embedded silicone tips rather than a flat, painted illusion of projection. That distinction affects both price and how repairs work down the line, which the craftsmanship behind YouQDOLL’s realistic dolls reflects in how finishes are built into the base material rather than applied as an afterthought.
Pro Tip: If a maker quotes one flat price for “any color,” ask whether that includes multi-tone blending or just a single pigment. Flat-rate quotes often mean flat-rate results.
Silicone vs. TPE: How Base Material Shapes Your Areola Choices
Your doll’s base material decides which areola techniques will actually hold up, and this detail gets skipped in most buying guides. Silicone takes pigment differently than thermoplastic elastomer (TPE), and that difference shows up in both realism and longevity.
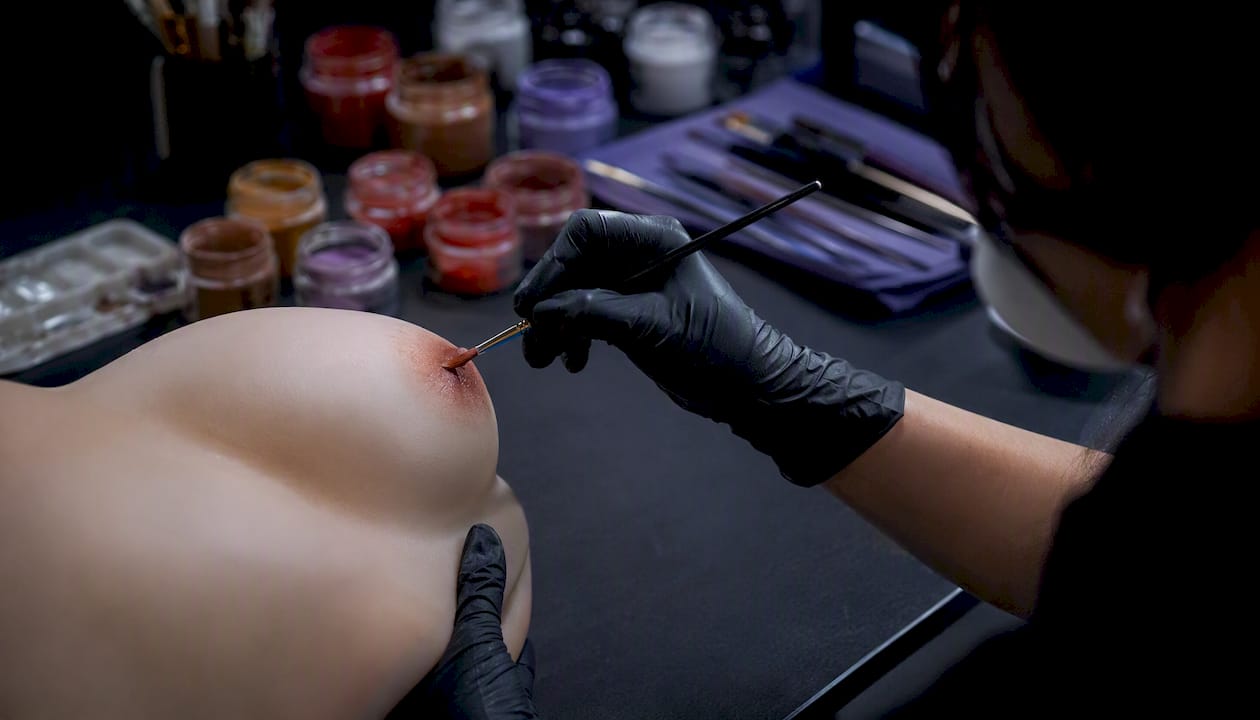
Silicone has a smoother, less porous surface, which makes it a strong candidate for layered, multi-tone shading. Pigments sit closer to the surface and blend cleanly, similar to how medical-grade pigments applied in layered fashion closely replicate native areolar coloration in reconstructive tattooing. TPE is softer and slightly more absorbent, which some makers use to their advantage for subtle texture work but which can also cause pigment to diffuse unevenly if not applied carefully.
Tactile projection works differently across materials, too. On silicone, embedded nipple tips tend to hold their shape longer because the material itself is firmer and more resistant to compression over repeated use. On TPE, projection is more commonly achieved through shaping during the mold process combined with surface shading, since TPE’s flexibility can cause a hard embedded piece to feel less integrated.
| Factor | Silicone | TPE |
|---|---|---|
| Realism | Very high, fine detail holds well | High, softer feel reads as skin-like |
| Tactile projection | Embedded tips stay firm longer | Molded shaping feels more natural to the touch |
| Pigment adhesion | Excellent, minimal bleed | Good, but needs careful sealing |
| Permanence/repairability | Repairs are cleaner but pricier | Repairs are simpler and faster |
| Price/upgrade cost | Higher | Lower to moderate |
| Lead time | Longer, more precision work | Shorter |
- Silicone favors buyers who want the most convincing multi-tone shading and don’t mind a longer build time.
- TPE favors buyers who want a softer feel and faster turnaround at a lower upgrade cost.
Maintenance flows directly from this material choice, and it’s worth reading before you commit, since a silicone areola upgrade and a TPE one call for different cleaning products entirely.
Choosing Areola Color: Single Shade vs. Multi-Tone Blending
A single flat color is the cheapest option and the least convincing one. Multi-tone blending, where a maker layers two or three pigment shades to create depth, is what separates an areola that looks painted from one that looks alive. This is the same principle behind layered pigment techniques used in clinical NAC tattooing, where a single color rarely mimics real tissue accurately.
Three approaches dominate the market:
- Single-shade: one flat pigment color, fastest and cheapest, but visibly artificial under close light
- Multi-tone blended: two to three shades worked together for a gradient effect that mimics natural variation
- Layered shading: the most advanced approach, using darker and lighter tones plus shadow placement to add dimensional depth
Picking the right tone starts with your doll’s skin undertone. Warm undertones (yellow or golden base) usually pair with brown to rosy-brown areola tones, while cool undertones (pink or blue base) tend to pair better with pink to mauve shades. Contrast matters too: a high-contrast areola against pale skin reads as bold and defined, while a low-contrast blend feels softer and more subtle.
Creative variations exist within this framework. Some buyers request a slightly darker pigment concentration at the nipple center that fades outward, mimicking how natural pigmentation often gradates. Others prefer a distinct pink-toned palette over a brown one purely for aesthetic preference, since paramedical tattoo artists routinely adjust pigment mixes to match individual skin tones rather than using one universal shade.
Pro Tip: Ask your maker for swatch photos taken in natural daylight, not studio lighting. Pigments that look perfect under warm indoor light can shift noticeably once you get the doll home, and a quick daylight photo avoids that surprise.
Sizing Areolas and Choosing the Right Nipple Projection
Diameter and projection are the two measurements buyers most often guess at, and guessing is where most post-delivery disappointment starts. As a general rule, areola diameter should scale with breast size and chest width rather than following a single universal number. Smaller busts typically look proportionate with a 28 to 35mm diameter, while fuller busts often call for 35 to 45mm to avoid looking undersized.
Projection comes in four tiers, and each one changes how the doll feels, not just how it looks:
- Flush/flat: areola is fully flat with no raised nipple, achieved through paint or shading alone
- Low profile: a slight raise, often molded into the base material itself
- Medium projection: a noticeable raised nipple, still soft to the touch
- High projection: embedded silicone tips that extend further and hold a firmer shape
Shape adds another layer of realism most buyers overlook. Round is the default, but oval is common and, notably, deliberate asymmetry between left and right sides often looks more natural than perfect symmetry. Real bodies rarely match side to side exactly, and reconstructive practice actually uses the contralateral (opposite side) areola as a mapping reference precisely because natural variation is the goal, not a flaw to correct.
To avoid mismatched expectations, include this with your order:
- Two to three reference photos taken from straight-on and slightly angled views
- A note on which side (if any) should serve as the size reference
- Your preferred projection tier, described in plain language, not just a technical term
- Any request for intentional asymmetry, stated explicitly so it isn’t corrected as an error
Pro Tip: If you’re ordering based on a reference photo of a real person, ask the maker to confirm the projection tier they interpret from that photo before production starts. What reads as “medium” to you might read as “low” to them.
How Areolas Are Actually Made: Paint, Airbrush, and 3D Shading
Every areola on a custom doll comes from one of five production methods, and each one trades off differently between realism, durability, and cost.
Hand-painting is the most basic approach: a single or dual-tone pigment applied by brush. It’s fast and inexpensive but tends to look flat under close inspection. Airbrushing improves on this by creating smoother gradients with a fine mist application, giving a softer transition between tones than a brush allows.
Layered pigment shading, adapted from paramedical 3D areola tattooing, goes further still. This technique builds color in stages, using darker and lighter pigment tones plus deliberate shadow and highlight placement to create the optical illusion of a raised nipple, even on a flat surface. It’s the closest doll finishing gets to genuine paramedical tattoo work, and it’s why premium makers now market it as a distinct upgrade tier.
Printed transfers offer a cheaper, faster alternative using pre-printed pigment patterns, though they sacrifice the individualized blending that makes layered shading convincing. Embedded silicone nipples solve projection physically rather than optically, inserting a separate silicone piece shaped and colored to match, which holds its form better over time than any painted illusion.
| Method | Visual authenticity | Tactile feel | Permanence | Repairability | Typical cost |
|---|---|---|---|---|---|
| Hand-painted | Moderate | Flat | Low, fades faster | Easy, quick touch-up | Low |
| Airbrushed | Good | Flat | Moderate | Easy | Low to moderate |
| Layered 3D shading | Very high | Flat but visually raised | Moderate to high | Requires skilled reapplication | Moderate to high |
| Printed transfer | Moderate | Flat | Low to moderate | Simple replacement | Low |
| Embedded silicone | High | Genuinely raised | High, physically stable | More involved, may need part swap | High |
If realism under close inspection is your priority, layered 3D shading or embedded silicone wins. If you want the lowest cost with acceptable results, airbrushing is the practical middle ground.
Pro Tip: Request a close-up photo of the exact technique applied to the same base material your doll will use. A 3D shading sample on silicone looks and behaves differently than the same technique on TPE, and a generic sample photo won’t tell you what to expect.
What to Prepare Before You Place a Custom Areola Order
A smooth custom order comes down to what you hand the maker upfront. Skimp on details here, and you’ll spend weeks in back-and-forth revisions instead of a single clean approval.
Gather this before you start the order form:
- Desired areola diameter in millimeters, not vague terms like “medium”
- Reference photos, including both sides if you want a specific match
- Your chosen skin tone selection for the doll’s overall body
- Preferred projection level, described using the four tiers above
- Any specific texture requests, like Montgomery gland detailing
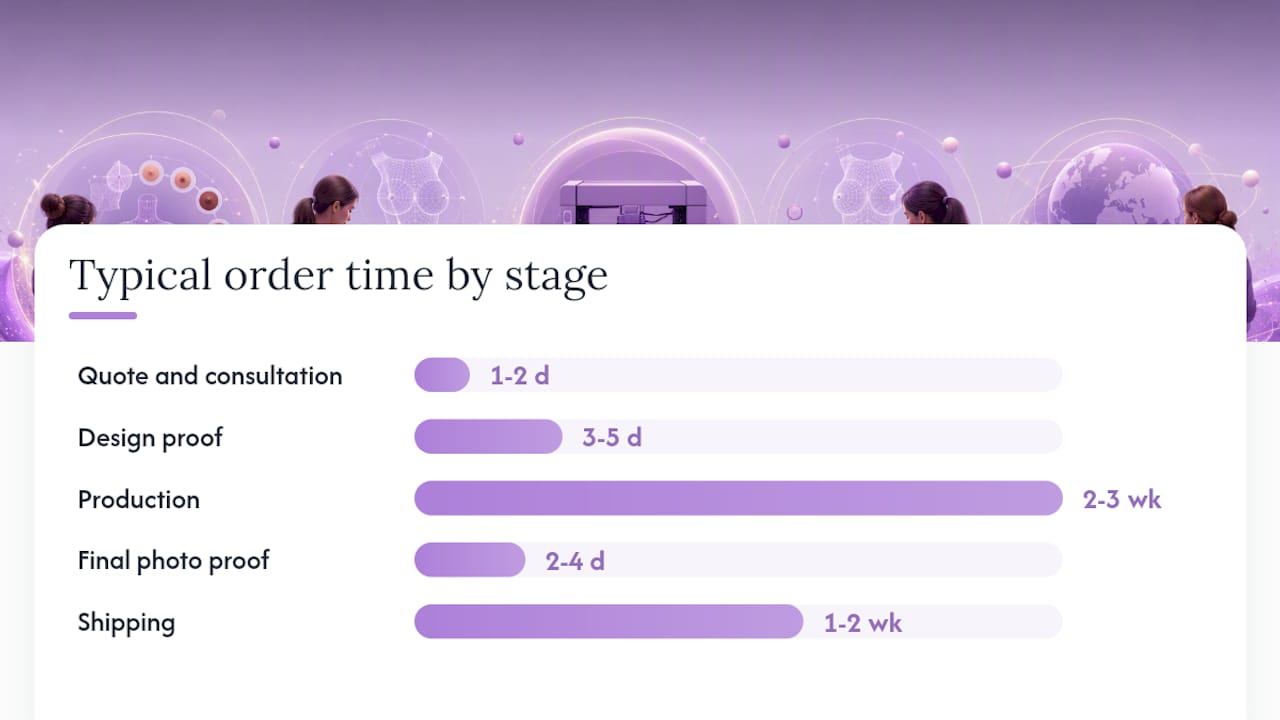
The typical workflow runs in five stages: you submit a quote request, the maker returns a design mock or proof for approval, you sign off (or request revisions), production begins, and a final photo proof goes out before shipping. Each stage adds time, and premium techniques add more.
| Stage | Typical timeframe | Notes |
|---|---|---|
| Quote and consultation | 1 to 2 days | Faster with complete reference photos upfront |
| Design proof | 3 to 5 days | Longer for multi-tone or 3D shading requests |
| Production | 2 to 3 weeks | Varies by base doll complexity |
| Final photo proof | 2 to 4 days | Request natural-light photos here |
| Shipping | 1 to 2 weeks | Depends on destination and method |
Upgrade costs for premium techniques like layered 3D shading or embedded silicone typically run higher than standard airbrushing, though exact pricing varies by maker and doll model.
Pro Tip: Always request the final proof photo be taken in natural daylight, not under studio lighting. A pigment blend that looks perfect under warm bulbs can read completely differently once you unbox the doll at home.
Keeping Areola Finishes Looking Real Over Time
Pigment fade is not a hypothetical. It’s documented in the same clinical literature that informs doll finishing techniques, and buyers who understand it upfront avoid disappointment later.
Clean areola areas with mild, material-safe soap and water. Avoid alcohol-based or harsh solvent cleaners entirely. They strip pigment faster than normal wear does. Store the doll away from direct sunlight, since UV exposure accelerates fading on both silicone and TPE surfaces.
On fade timelines, reconstructive tattoo research offers a useful benchmark: one study tracked in a review of NAC reconstruction and tattooing techniques found an average 6.5% decrease in color intensity after one year, with reported satisfaction still holding around 70% at that point. That’s a meaningful data point for doll buyers too. Painted and shaded finishes are not permanent, and light fading within the first year is normal rather than a defect.
When touch-ups become necessary, most makers offer repainting or re-shading services, and embedded silicone nipples can typically be replaced as a separate part rather than requiring a full return.
- Clean weekly with mild, material-appropriate soap, never solvents
- Store away from direct sunlight and heat sources
- Expect light color fading within the first year as normal wear
Pro Tip: Photograph your doll’s areola finish right after delivery. It gives you a clear before reference if you ever need to judge fading or request a touch-up.
A Decision Checklist for Picking Your Areola Configuration
Start by ranking your actual priority: realism, low maintenance, or budget. That single decision filters out most of the noise on an order form.
If realism tops your list, choose layered 3D shading or embedded silicone nipples, request multi-tone blending, and confirm the maker uses your doll’s actual base material for samples. If low maintenance matters more, embedded silicone outperforms painted finishes since it doesn’t rely on surface pigment that fades. If budget drives the decision, airbrushed single or dual-tone shading gets you a solid visual result without premium pricing.
Three ready-made starting configurations:
- Realism-first: silicone base, multi-tone 3D shading, medium to high projection, Montgomery gland texturing
- Budget-friendly: TPE base, airbrushed single-shade color, low profile projection
- Low-maintenance: either material, embedded silicone nipples, simple color blend, minimal texture detail
Pro Tip: Ask three questions before you finalize: Do you blend pigments or use a flat color? What’s your typical fade timeline? Can you match this specific reference photo, or only a general tone family? A maker’s answers to those three questions tell you more than any product photo will.
The Paramedical Science Behind Realistic Areola Shading
Doll makers borrowed 3D areola shading directly from reconstructive tattoo artists, and understanding why it works helps you evaluate what you’re paying for. The technique relies on the same principle used after mastectomy reconstruction: pigment alone, placed correctly, can trick the eye into seeing depth that isn’t physically there.
The mechanism is straightforward once you see it explained. Artists apply darker tones toward the outer edge and lighter, highlighted tones toward the center, mimicking how light naturally falls across a raised surface. Fine stippling adds subtle texture that reads as Montgomery glands, and specialists deliberately keep these dots irregular rather than uniform, since a perfectly patterned grid looks artificial while natural variation looks convincing.
On durability, expect the fading pattern discussed earlier to apply here as well. Multi-tone work tends to fade unevenly rather than uniformly, since lighter highlight tones often lose intensity faster than darker base tones.
Two practical takeaways follow from this research:
- Makers use layered pigments because a single flat tone cannot replicate the shadow-and-highlight interplay that reads as “real” to the eye.
- Embedded silicone elements get chosen over shading when a buyer wants guaranteed physical projection that won’t rely on an optical illusion holding up under direct light or touch.
Author Perspective: Realism Versus Upkeep
Multi-tone 3D shading and embedded silicone tips earn their premium when the doll gets regular close-contact use or serves as a display piece under good lighting. That’s where the extra cost pays off visually and tactilely.
If your doll spends most of its time stored or repositioned infrequently, that premium buys less than the price tag suggests. A well-executed airbrushed finish holds up fine under casual conditions and doesn’t demand the same fade-conscious care routine.
My rule of thumb: collectors and display-focused buyers should lean toward realism-first configurations. Buyers prioritizing frequent, practical use should lean toward embedded silicone or simple, durable shading that won’t need constant touch-up attention.
Ready to Order? Here’s How Custom Areolas Work With YouQDOLL
Choosing your ideal areola setup shouldn’t feel like guesswork, and Youqdoll built its ordering process so it isn’t. Unlike generic doll retailers offering a handful of preset options, Youqdoll lets you specify diameter, color blend, projection tier, and texture detail directly, then confirms it all with a proof before production locks in.
Here’s how the process runs:
- Pick your base doll, like the Scarlett 166cm Silicone or Carla 166cm Silicone
- Confirm your material, since silicone and TPE call for different finishing techniques
- Select your areola package, from standard airbrushed color to premium multi-tone shading
- Upload reference photos if you want a specific match
- Review your proof and confirm before final production begins
Youqdoll ships every order discreetly, backs every custom build with a satisfaction guarantee, and provides sample photos on request so you know exactly what you’re paying for before you commit. If silicone realism with embedded projection options is your priority, the Tiffany 166cm Silicone model is a strong starting point for a premium custom configuration. Browse the current lineup and start your custom areola request today.
Frequently Asked Questions
What are the main sex doll areola options I can customize? You can typically customize diameter, color and tone approach, nipple projection level, surface texture, and the application method used, whether that’s painting, airbrushing, 3D shading, or embedded silicone.
Does silicone or TPE hold areola pigment better? Silicone generally holds layered, multi-tone pigment more cleanly due to its smoother surface, while TPE works well with molded projection and simpler color applications.
How long does a custom areola order take? Expect roughly four to six weeks total from quote to shipping, with premium techniques like 3D shading adding extra time to the design and production stages.
Will the areola color fade over time? Some fading is normal. Clinical tattooing research shows measurable color-intensity decreases within the first year, so occasional touch-ups keep the finish looking fresh.
Should I choose flat painted areolas or embedded silicone nipples? Choose embedded silicone if you want guaranteed physical projection and lower long-term maintenance; choose painted or shaded finishes if budget and flexibility matter more than permanent projection.
Sources
These sources cover the paramedical and clinical foundations behind the shading and projection techniques used in premium doll customization:
- A review of nipple-areola complex reconstruction and tattooing techniques - Fuentes - Gland Surgery
- The Step-by-Step Process of 3D Areola Tattooing - Pol Mol
- Creating Ultra-Realism in 3D Areola Restoration Tattoos