

How to Make a Sex Doll: DIY Methods From Budget to Advanced
Making a sex doll at home is genuinely doable — but the right method depends entirely on your skill level, budget, and safety setup. Four routes work: plush/mannequin conversion (low-cost, no skills needed), sewn stuffed fabric doll (mid-skill, moderate budget), foam armature with coatings (advanced hobbyist level), and silicone or TPE casting (professional complexity, high cost). If you want lifelike results without a workshop, commissioning a custom doll from Youqdoll is the faster, safer path.
Here’s how each method stacks up at a glance:
- Plush/mannequin conversion: Low cost, a few hours, zero prior skills. Best for first-timers testing the concept.
- Sewn fabric doll: Moderate budget, a weekend, basic sewing ability. Better shape control and washable covers.
- Foam armature with coatings: Higher cost, multiple days, comfort with tools and adhesives. Sculpted shape, smoother skin.
- Silicone/TPE casting: High cost, weeks of work, near-professional equipment. Closest to commercial results — but demanding.
Safety first, always. Use disposable barriers (condoms or commercial sleeves) for any insertable surface. Never use porous materials like open-cell foam or untreated fabric for openings. Wear gloves, eye protection, and a respirator when working with adhesives, solvents, or casting compounds. If your workspace lacks ventilation or you can’t source body-safe materials, stop and buy instead.
Pro Tip: If you’re unsure which method fits your situation, start with the plush conversion. It costs almost nothing, teaches you what you actually want, and tells you whether a more advanced build is worth the investment.
Key Takeaways
Choosing the right method from the start — matched to your skill, budget, and safety setup — is the single decision that determines whether your build succeeds or stalls.
| Point | Details |
|---|---|
| Match method to skill and budget | Budget builds under $80 are beginner-friendly; silicone casting above $300 requires near-professional skills and equipment. |
| PPE and ventilation are non-negotiable | Gloves, respirator, and eye protection are required for any adhesive, sealant, or casting work — no exceptions. |
| Use disposable barriers for insertables | Commercial sleeves or condoms must cover all insertable surfaces and be replaced every single session. |
| Inspect and maintain on a schedule | Visual check before every use; full hands-on inspection monthly; replace sleeves and worn covers on a set schedule. |
| Youqdoll for lifelike, safe results | When DIY costs exceed $300 or realism is the priority, Youqdoll’s custom silicone and TPE dolls deliver professional quality with a satisfaction guarantee. |
This article provides general informational guidance only. Check your local laws regarding adult products before building or purchasing, and consult a qualified professional for legal or medical questions.
Table of Contents
- How to make a sex doll: complete materials and tools by method
- Method 1: converting a stuffed form into a budget build
- Method 2: sewing a fabric doll for better shape and hygiene
- What internal skeleton options give you the best results?
- Method 3: shaping foam for a sculpted body without casting
- Method 4: silicone and TPE casting for advanced builders
- Finishing touches that make your build look and feel real
- Cleaning, storage, and repairs for every DIY method
- What does each method actually cost, and how long does it take?
- Legal, ethical, and material safety rules you can’t ignore
- DIY vs. buying a custom doll: which one is right for you?
- Why makers choose DIY — and when they stop
- Skip the workshop and get a custom doll built for you
- Sources
How to make a sex doll: complete materials and tools by method
Before you cut, sew, or pour anything, gather everything on your method’s list. Running out of materials mid-build causes rushed substitutions — and that’s where safety shortcuts happen. Silicone and TPE are the two dominant materials for realistic results, but every method below has its own supply chain.
Plush/mannequin conversion
- Rolled bath towels or pool noodles (body core)
- Polyester fiberfill or foam offcuts (padding)
- Duct tape or packing tape (shaping)
- Pillowcase or stretchy fabric tube (outer skin)
- Commercial masturbation sleeve or condoms (insertable barrier — non-negotiable)
- Needle and thread or safety pins
Sewn fabric doll
- Stretch fabric (spandex or jersey, skin-toned)
- Polyester fiberfill
- Sewing machine or hand-sewing needles, thread
- Doll pattern (drafted or purchased)
- Removable zipper or velcro for cover access
- Replaceable internal sleeve for insertable areas
Foam armature with coatings
- PVC pipe or flexible wire armature
- Closed-cell foam blocks or sheets (EVA or polyethylene foam)
- Contact cement or foam-safe adhesive
- Flexible latex or silicone sealant (skin coating)
- Acrylic or silicone-based pigments
- Sandpaper (80–220 grit), sculpting tools
Silicone/TPE casting
- Sculpting clay (oil-based, non-sulfur) for the master
- Two-part platinum-cure silicone or hobby-grade TPE pellets
- Mold release agent
- Digital scale (accurate to 1g)
- Mixing cups, stir sticks
- Vacuum chamber or pressure pot (strongly recommended)
- Respirator (P100 with organic vapor cartridges), nitrile gloves, safety glasses
- Temperature-controlled workspace
PPE and ventilation — required for all methods
Porous materials trap bacteria, and uncured resins, adhesives, and solvents carry real inhalation risks. At minimum: nitrile gloves for every session, safety glasses when mixing or cutting, and a respirator rated for organic vapors when working with any adhesive, sealant, or casting compound. Work in a room with open windows and a fan exhausting air outward.
Sourcing tips
Buy platinum-cure silicone from established suppliers like Smooth-On or Reynolds Advanced Materials. For TPE hobby kits, verify the product is labeled body-safe or skin-safe before purchasing. Avoid hardware-store caulk or general-purpose sealants for skin-contact surfaces — they often contain fungicides or acetic acid that irritate skin.
First pours almost always have waste from mixing errors or air bubbles, and running short mid-pour ruins the entire cast.*
Method 1: converting a stuffed form into a budget build
This is the fastest way to make a sex doll with materials you can source locally for under $20. Practical home methods like pool noodles and rolled towels are well-documented starting points — the goal here is to do them safely and hygienically.
Step-by-step
- Build the core. Roll two or three bath towels into a cylinder roughly the length and girth you want. Alternatively, use a pool noodle as the spine and wrap towels around it for padding.
- Shape the body. Add fiberfill or foam offcuts to build out hips or chest areas. Secure everything tightly with duct tape, wrapping in overlapping layers.
- Cover the form. Slide a pillowcase or a tube of stretchy fabric over the taped core. Sew or pin the ends closed. This is your removable outer skin — it should come off easily for washing.
- Prepare the insertable area. Cut a small opening in the fabric cover at the appropriate position. Insert a commercial masturbation sleeve or fit a condom over a pool noodle section. The sleeve or condom is your actual contact surface — the foam or towel beneath never touches skin.
- Secure the sleeve. Use a rubber band or fabric tie to hold the sleeve in place so it doesn’t shift during use.
- Test stability. Lay the form flat and press on it from different angles. If it collapses or shifts dramatically, add more tape layers or a firmer core before use.
Hygiene checklist for this method
- Replace the condom or sleeve every single session — no exceptions.
- Wash the fabric outer cover after each use (machine wash, hot cycle).
- Never use the foam or towel core as a direct contact surface for insertable areas.
- Inspect the tape structure monthly; re-tape if the form loses rigidity.
Pro Tip: Sew a simple zippered pillowcase as your outer cover instead of pinning it. A zipper lets you remove and launder the cover in under a minute, and it keeps the build looking tidy during storage.
Method 2: sewing a fabric doll for better shape and hygiene
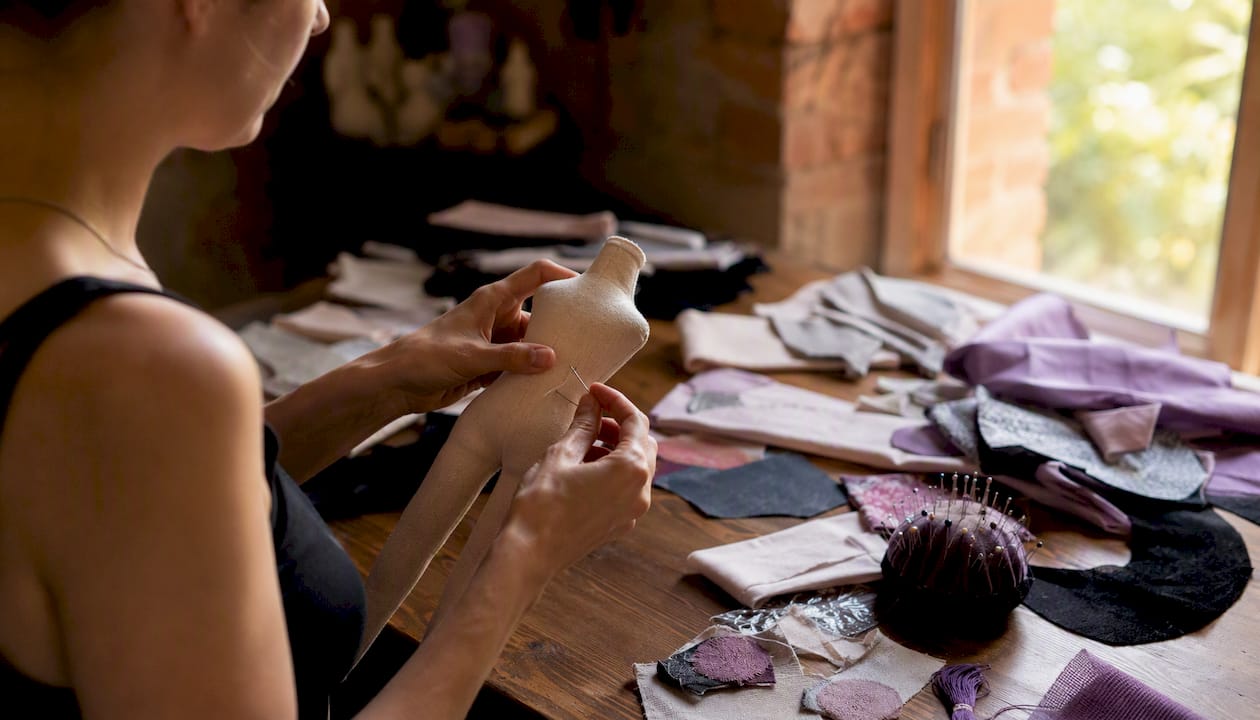
A sewn stuffed doll gives you real control over proportions, a washable skin, and a structure that holds up far better than tape-and-towel builds. Basic sewing ability is enough — you don’t need a serger or advanced pattern skills.
Planning your pattern
Start with a torso-only form rather than a full body. A torso is faster to sew, easier to stuff evenly, and more practical to store. You can find free or low-cost doll body patterns online, sized for adult proportions, or draft your own by tracing a body pillow and adding shaping darts at the waist and chest.
Cut your pattern pieces from stretch fabric (spandex or jersey works well). Leave a 1/2-inch seam allowance on every edge. Mark your insertable opening position before sewing — it’s much easier to reinforce that area before the pieces are joined.
Step-by-step sewing sequence
- Reinforce the insertable area. Before sewing pieces together, stitch a double layer of fabric around the opening position and add a fabric sleeve tunnel (a short tube of fabric sewn into the seam) to hold a removable insert.
- Sew the main seams. Join front and back panels with a strong straight stitch, leaving the bottom open for stuffing.
- Stuff firmly. Pack polyester fiberfill tightly — loose stuffing compresses too much and loses shape quickly. For chest areas, use foam offcuts inside the fiberfill for firmer structure.
- Close the bottom seam. Hand-stitch or machine-stitch the base closed with a ladder stitch so it’s invisible and strong.
- Install the removable insert. Slide a commercial sleeve into the fabric tunnel you built in step 1. Secure it with a drawstring or velcro tab so it pulls out cleanly for replacement.
- Add a zippered outer cover. Sew a second, looser fabric cover that zips over the entire form. This is what you launder regularly; the stuffed inner body stays dry.
Fabric doll limitations
- Fabric builds are soft and tactile but not realistic in texture or weight.
- Laundering the outer cover is easy; the stuffed inner body should never be fully submerged.
- Spot-clean the inner body with a damp cloth and mild soap if needed, then air-dry completely before reassembling.
- Fabric surfaces are porous — always use a sleeve or barrier for insertable areas, and replace it every session.
What internal skeleton options give you the best results?
A skeleton turns a floppy stuffed form into something that holds a pose, supports weight, and lasts significantly longer. The right choice depends on your build method and how much rigidity you need.
- PVC pipe frame: Cheap, lightweight, and easy to cut. Use 1/2-inch or 3/4-inch pipe for limbs and a wider section for the torso core. Connect joints with PVC elbows and T-fittings. Rigid, not poseable.
- Flexible wire armature: Aluminum armature wire (3mm–6mm diameter) lets you bend and repose limbs. Twist multiple strands together for strength. Best for smaller builds or torso-only forms.
- Wooden dowel core: Sturdy and inexpensive. Useful as a spine in foam builds. Not poseable, but very stable under compression.
- Commercial ball-joint skeleton: Pre-made poseable skeletons exist for doll-making hobbyists. More expensive ($40–$120), but they provide realistic joint movement and are designed to be encased in soft materials.
When anchoring soft materials to any frame, round off and encapsulate all hardware to prevent punctures. Wrap metal ends with heat-shrink tubing or several layers of foam tape before covering with fabric or foam. Exposed wire ends or sharp pipe edges will eventually tear through any outer material.
Weight distribution matters more than most builders expect. A top-heavy form tips and falls, which stresses joints and tears seams. Keep the heaviest structural elements (pipe sections, wooden cores) centered in the torso, and use lighter materials (fiberfill, soft foam) for extremities.
Inspection checklist for skeletons: Before each use, press along the full length of the form and feel for any sharp protrusions, shifted hardware, or unusual rigidity. Monthly, remove the outer cover and visually inspect all joints and wire ends. Replace any component showing corrosion, bending fatigue, or exposed sharp edges immediately.
Method 3: shaping foam for a sculpted body without casting
Foam builds sit between sewn dolls and full silicone casting. You get a sculpted, custom shape and a smoother surface than fabric — without the equipment demands of mold-making. This is the sweet spot for hobbyists who want more realism but aren’t ready for a casting workflow.
Step-by-step foam build
- Build the armature. Start with a PVC pipe or wire frame (see skeleton section above). This is your structural spine — everything else attaches to it.
- Rough-shape with foam blocks. Cut closed-cell foam (EVA foam sheets work well) into body sections: torso, hips, chest. Glue sections together with contact cement, pressing firmly and allowing full cure time per the adhesive’s instructions.
- Carve and refine. Use a serrated knife or hot wire cutter to carve the foam into your target shape. Work slowly — you can always remove more foam, but you can’t add it back. Sand progressively from 80 grit to 220 grit for a smoother surface.
- Seal the surface. Apply a flexible latex or silicone-based sealant in thin coats, allowing each coat to dry fully before the next. Three to four coats build a skin-like surface that resists tearing.
- Paint and texture. Mix silicone-compatible pigments into your final sealant coat for skin tone. Stipple with a sponge for pore-like texture. Airbrush shading adds depth but requires practice.
- Prepare insertable areas. Do not rely on foam or sealant as a direct insertable surface. Cut a clean opening and install a commercial sleeve or use a condom barrier. The coating around the opening must be fully cured and smooth before use.
Materials for foam builds
- EVA foam sheets (6mm–25mm thickness, closed-cell)
- Contact cement (foam-safe, low-VOC preferred)
- Flexible latex or platinum-cure silicone sealant
- Silicone-compatible pigments (avoid oil-based paints on silicone coatings)
- 80, 120, and 220 grit sandpaper
Coating hygiene and repair
Coatings that are fully cured and non-porous are safer for skin contact than raw foam, but they still require disposable barriers for insertable areas. Check coatings for cracks or peeling before each use — a compromised coating exposes the porous foam beneath, which traps bacteria.
For small dings or tears, clean the area, let it dry, and apply a thin patch of the same sealant used originally. Feather the edges so the patch bonds cleanly. If a large section of coating peels or the foam beneath is visibly damaged, strip and re-coat that section rather than patching over a failing surface.
Method 4: silicone and TPE casting for advanced builders
This is the most demanding route — and the one closest to how professional dolls are actually made. Professional production involves sculpting a master, making molds, and using vacuum or pressure processes to eliminate bubbles. Replicating that at home is possible, but it requires real equipment, careful safety practices, and a realistic time commitment.
Top-level step sequence
- Sculpt the master. Use oil-based, non-sulfur clay (sulfur inhibits platinum-cure silicone). Sculpt your target form at full scale. Surface detail at this stage transfers directly to the final cast, so refine carefully.
- Build a two-part mold. Divide the master at a parting line, build a clay dam along that line, and pour the first half of your mold material (silicone or polyurethane). Once cured, flip, remove the clay dam, apply mold release, and pour the second half.
- Mix and degas your casting material. Weigh Part A and Part B of your silicone precisely per the manufacturer’s ratio. Mix thoroughly, then degas in a vacuum chamber to pull out air bubbles. Without degassing, pours produce weak spots and surface voids.
- Pour and cure. Pour slowly into the lowest point of the mold, letting material rise and push air out. Cure at the manufacturer’s specified temperature — rushing this step causes incomplete crosslinking and a tacky, weak result.
- De-mold and finish. Carefully separate mold halves. Trim any flash (thin silicone fins at the parting line) with sharp scissors. Sand or buff the surface if needed, then apply any pigment washes or finishing coats.
Essential equipment
- Respirator with P100 and organic vapor cartridges
- Nitrile gloves (change frequently)
- Digital scale (1g accuracy)
- Vacuum chamber and pump (or pressure pot for pressure casting)
- Mixing cups, stir sticks, mold release spray
- Temperature-controlled workspace (65–75°F is typical for platinum silicone)
Material safety and hazards
Platinum-cure silicone is relatively low-hazard when fully cured, but uncured components and their catalysts require careful handling. Tin-cure silicones release acetic acid during cure — use platinum-cure for skin-contact applications. TPE pellets require high-temperature melting equipment and produce fumes during processing; ventilation is critical. Dispose of uncured silicone waste per your local hazardous materials guidelines — do not pour it down drains.
Estimated costs for a full-body silicone cast are generally high depending on silicone volume and mold complexity. A torso-only project usually requires less budget. Time commitment typically spans multiple weeks from sculpting through final finishing for a first attempt. Careful planning of purpose, size, budget, and storage before starting saves significant rework.
Safety checklist before you start casting:
- Workspace has active ventilation (fan exhausting outward, open window)
- Respirator fitted and cartridges are fresh (replace every 8 hours of use)
- Nitrile gloves on; safety glasses worn during all mixing
- Disposal plan confirmed for uncured waste
- Fire extinguisher accessible (TPE processing involves heat)
- First aid kit within reach
Pro Tip: A build targeting realism often gets better results by combining a purchased high-quality silicone head or torso component with a sewn or foam body than by attempting a full-body cast at hobby scale. The head is the hardest part to cast well — buying that component and building the body yourself is a practical hybrid approach.
Finishing touches that make your build look and feel real
Raw builds look rough. Finishing is where you close the gap between a craft project and something genuinely satisfying. The techniques below apply across methods, though the specific products vary by base material.
Skin texturing and painting
- For foam and silicone surfaces, mix silicone-compatible pigments into a thin sealant coat and apply with a stippling sponge. This creates surface variation that reads as skin texture.
- Airbrush shading around joints, contours, and features adds depth. Use silicone-thinned pigments for silicone bases; acrylic-based paints work on sealed foam but will crack if the surface flexes significantly.
- Seal all painted surfaces with a final clear coat of the same sealant used for the base. This protects the finish and makes cleaning easier.
- Silicone generally cleans easier and lasts longer than TPE, and its surface holds paint better under repeated cleaning. TPE is softer and more flexible but needs gentler cleaning products to avoid surface degradation.
Hair: wigs vs. rooted
Wigs are the practical choice for DIY builds. They’re removable, washable, and replaceable without damaging the base. Use a wig cap glued lightly to the head surface, then clip or pin the wig in place. Avoid permanent adhesives — they make wig replacement nearly impossible.
Rooted hair (individual strands punched into the surface with a felting needle or rooting tool) looks more realistic but is time-intensive and only works on silicone or firm foam surfaces. Once rooted, hair is not easily replaced if it sheds or tangles.
Nails, lashes, and small details
Attach press-on nails with a small dot of body-safe silicone adhesive rather than cyanoacrylate (super glue), which can damage silicone surfaces. Individual false lashes can be set with the same silicone adhesive. Keep all adhesive away from insertable areas.
Wardrobe and storage
Dress your build in light-colored, loose-fitting fabric. Dark or brightly dyed fabrics can transfer pigment to silicone or coated foam surfaces, especially under heat or compression. Protecting silicone from staining starts with fabric choice. Store the build lying flat or hanging vertically in a breathable fabric bag, away from direct sunlight and heat sources.
Cleaning, storage, and repairs for every DIY method
Hygiene isn’t optional. A build that isn’t cleaned properly after every use becomes a bacterial hazard quickly, regardless of how well it was made.
Cleaning checklist by material
- Fabric covers: Machine wash on hot after every use. Air-dry completely before reassembling — trapped moisture causes mold inside stuffed forms.
- Foam surfaces (sealed): Wipe with a damp cloth and mild soap. Rinse with a clean damp cloth. Never submerge foam builds — water penetrates seams and doesn’t dry out fully.
- Silicone surfaces: Wash with warm water and mild antibacterial soap. Pat dry with a lint-free cloth. Apply a light dusting of cornstarch or renewal powder to restore the soft, non-tacky feel. Full cleaning routines, recommended cleaners, and lubricant compatibility guidance are worth reviewing before your first use.
- TPE surfaces: Clean with warm water and mild soap only — avoid alcohol-based cleaners, which degrade TPE over time. Dry thoroughly; TPE holds moisture in micro-pores if not dried properly.
- Sleeves and barriers: Dispose of after every single session. No exceptions.
Drying and storage
Dry all surfaces completely before storage — even a small amount of trapped moisture causes mold and material breakdown. Store fabric builds in a pillowcase or breathable bag. Store foam and silicone builds lying flat or suspended vertically; avoid folding or compressing silicone for extended periods, as it can cause permanent creasing.
Common repairs
- Patching foam: Clean the damaged area, let it dry, apply contact cement to both surfaces, press together, and clamp for the adhesive’s full cure time.
- Resewing fabric covers: Use a strong hand-stitch (backstitch or whipstitch) for seam repairs. Reinforce the area with an iron-on fabric patch on the inside before resewing.
- Replacing sleeves: Pull the old sleeve out of its fabric tunnel or mounting point, clean the tunnel, and insert a new sleeve. This should take under two minutes if the build was designed with replacement in mind.
- Re-coating foam: Strip any peeling sealant with isopropyl alcohol (test a small area first), sand lightly, and apply fresh coats of sealant.
Routine inspection schedule: Visually inspect before every use for tears, exposed hardware, or coating failures. Do a full hands-on inspection monthly — press along the entire form, check all seams, and test sleeve security. Scheduled replacement of high-wear items like sleeves and removable skins extends usable life significantly.
What does each method actually cost, and how long does it take?
Realistic expectations prevent abandoned projects. These ranges reflect typical first-build costs including materials, basic tools, and consumables.
| Method | Estimated Cost | Time to Complete | Skill Level |
|---|---|---|---|
| Plush/mannequin conversion | Under $20 | 1–3 hours | Beginner |
| Sewn fabric doll | $20 | 1–2 days | Intermediate |
| Foam armature with coatings | $80–$200 | 2–4 days | Advanced hobbyist |
| Silicone/TPE casting (torso) | $100 | 1–2 weeks | Near-professional |
| Silicone/TPE casting (full body) | $300–$1,000+ | 2–4 weeks | Professional |
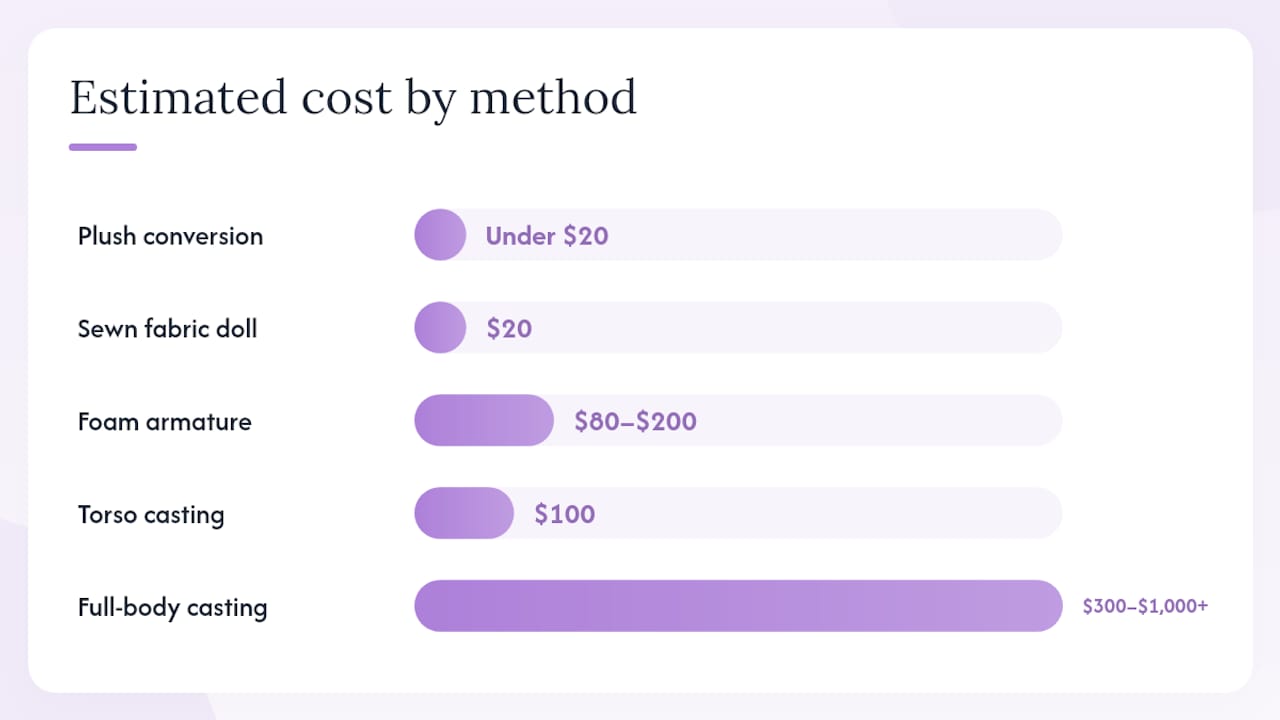
A few notes on recurring costs: sleeves and barriers need replacing every session (budget $5–$15/month depending on frequency). Cleaning supplies add another $5–$10/month. Fabric covers wear out and need replacement every few months with regular use.
The break-even point is worth thinking about honestly. A full silicone cast at $400–$1,000 in materials, plus 2–4 weeks of labor, often costs more in time and money than a professionally made torso from Youqdoll — and the professional version uses medical-grade materials, has no air bubbles or weak spots, and comes with a satisfaction guarantee. Understanding the factors that affect doll lifespan makes the comparison clearer: a well-made professional doll maintained properly outlasts most hobby casts by years.
- Budget builds under $80 make clear financial sense for DIY.
- Foam builds at $80–$200 are reasonable if you enjoy the craft process.
- Silicone/TPE casting above $300 is where buying often wins on value.
Legal, ethical, and material safety rules you can’t ignore
These aren’t suggestions. Get them wrong and you face health risks, legal exposure, or both.
Ethical rules
- Never create a doll that resembles a minor. This is both an ethical absolute and a legal issue in most jurisdictions. Any doll depicting a person under 18 is illegal in the United States and many other countries, regardless of the material or method used.
- Never replicate the likeness of a real person without their explicit consent. Creating a doll based on someone’s appearance without permission raises serious legal issues around right of publicity and harassment law.
Legal cautions
Laws governing adult products vary significantly by state and country. Obscenity statutes, import regulations, and likeness laws all potentially apply. Check your local statutes before building or purchasing. When in doubt, consult an attorney familiar with your jurisdiction’s adult content laws rather than relying on general online guidance.
Material hazards checklist
- Solvents and adhesives: Use in ventilated spaces only. Many contact cements and sealants contain hexane or toluene — both cause neurological damage with repeated inhalation exposure.
- Isocyanates (in some polyurethane foams and casting resins): Severe respiratory sensitizers. A P100 respirator with organic vapor cartridges is the minimum protection; a supplied-air respirator is safer for extended work.
- Uncured silicone and catalysts: Skin and eye irritants. Nitrile gloves and safety glasses are required during all mixing and pouring.
- Disposal: Uncured resin waste is hazardous. Check your local hazardous waste disposal guidelines — do not pour uncured materials down drains or into regular trash.
Material safety guidance for sex doll construction covers these risks in detail and is worth reading before you purchase any casting materials.
When in doubt about safety or legality, commissioning a professional like Youqdoll avoids most of these risks entirely — the materials are already vetted, the process is handled by experts, and you receive a finished product that meets safety standards.
Pro Tip: Before buying any casting kit, search the product name plus “SDS” (Safety Data Sheet) to pull up the manufacturer’s hazard documentation. If the seller doesn’t publish an SDS, don’t buy the product.
DIY vs. buying a custom doll: which one is right for you?
This is the decision that matters most. Be honest with yourself about what you actually want.
DIY pros and cons
Pros:
- Low entry cost for budget methods
- Creative control over shape and proportions
- Satisfying as a craft project
- Iterative — you can rebuild and improve
Cons:
- Time-intensive at every skill level
- Budget builds lack realism and durability
- Advanced builds require expensive equipment and real skill
- Safety risks from materials if PPE and ventilation aren’t managed
- Results rarely match professional quality, especially for full-body builds
Buying a professional custom doll: pros and cons
Pros:
- Medical-grade silicone or TPE, non-porous and body-safe
- Lifelike detail that DIY methods can’t replicate at hobby scale
- No material hazards to manage
- Warranty and satisfaction guarantees
- Discreet shipping and professional packaging
Cons:
- Higher upfront cost
- Less hands-on creative involvement
- Lead time for custom orders
When commissioning is clearly the better choice
- You want full-body realism with accurate weight, texture, and articulated joints.
- You need non-porous, medical-grade materials for safe long-term use.
- Your workspace lacks proper ventilation for casting work.
- Your total DIY materials budget exceeds $300 — at that point, professional quality is within reach.
- You want a specific body type, skin tone, or facial feature set that requires precision sculpting.
Evaluating silicone doll quality — checking seams, joint attachments, and skin finish — shows exactly what professional production achieves that hobby builds struggle to match. For readers who’ve worked through this guide and decided the DIY path isn’t for them, that’s a direct, reliable alternative.
Why makers choose DIY — and when they stop
DIY builds make sense as a starting point. They’re cheap, they teach you what you actually want, and there’s genuine satisfaction in making something yourself. The plush conversion and sewn fabric methods are legitimate creative projects, not just workarounds.
Where I see people go wrong is in underestimating the gap between a foam build and a professional silicone doll. That gap isn’t just about materials — it’s about the tooling, the process control, and the years of refinement that go into professional production. A hobbyist casting silicone for the first time will almost certainly produce a result with bubbles, uneven cure, or surface defects that a professional would reject before it left the workshop.
The honest recommendation: build the budget version first. Learn what you want. Then decide whether the advanced build is worth your time and money, or whether commissioning a custom doll from Youqdoll gets you there faster and safer. For most people who reach the silicone casting section of this guide, buying is the smarter call — not because DIY is wrong, but because the investment of time and materials at that level often exceeds the cost of a professionally made alternative.
Safety is the non-negotiable. If your workspace isn’t set up for casting work, don’t attempt it. The creative satisfaction of a DIY build is real. The health risks of working with solvents and resins in an unventilated space are also real.
Skip the workshop and get a custom doll built for you
If you’ve read through this guide and realized the workshop isn’t for you, Youqdoll is the direct alternative. Every doll is crafted from medical-grade silicone or TPE — non-porous, body-safe, and built to last. You choose the body type, skin tone, facial features, and hair. Youqdoll handles everything else.

No casting fumes. No failed pours. No weeks of labor. The Scarlett 166cm silicone doll and the Carla 166cm silicone model are two of the most popular full-body options, with complete customization available at checkout. Browse the full lineup at Youqdoll and find your perfect match.
Sources
These sources informed this guide and are worth bookmarking for deeper reference:
- How to Create Your Own Love Doll: Step-by-Step Guide – Aquarian Consult
- How to Make a Sex Doll: DIY Guide & Safer Alternatives | Jissbon